Pizza baker of the week: dough and behold
How did your love for making pizza begin?
I’ve always loved pizza for as long as I can remember, but I only really started making my own dough and baking bread in my late thirties. I’d progressed as much as I could with a baking stone and conventional oven, so one glorious day in 2017 I bought an Ooni3, a small portable pizza oven that would totally change my world! All it took was one bake with this oven and I was completely hooked. I was amazed at how you could create such a wonderfully light, fluffy, puffed up crust pizza in just 60 seconds, way better than anything from a supermarket! I began searching online for perfect Neapolitan pizza dough recipes, I joined Facebook forums all about pizza, and my daughters and I started an Instagram account to document our progress. When my youngest daughter’s school was having a Christmas fair, my eldest daughter and I asked if we could set up a pizza stall to help raise some extra funds, and it was this moment that Dough and Behold was born, a proper little family business! Nothing beats making and stretching pizzas with your kids (and my lovely wife who took all the orders!!)

What style of pizzas do you make?
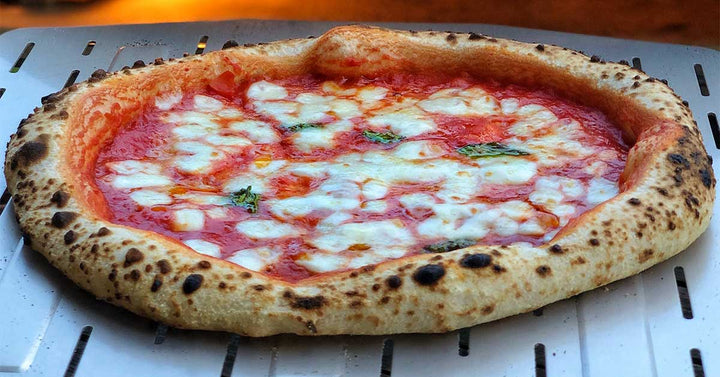
I think this question should be “What style of pizza wouldn’t I make?” The answer is none! I love all styles of pizza and have so many still to try, but in my heart of hearts, my favourite style has to be classic Neapolitan pizza, this is what I make 99% of the time!
Which items and tools do you have in your pizza kitchen?
A bone of contention in our small flat. One could possibly argue I have too much pizza paraphernalia! However, I will list my most useful and cherished items. My main oven is an Ooni Koda 16, I have a fantastic 16inch Bamboo pizza peel, great for launching larger pizzas, and a selection of really cheap 12 inch wooden peels that are excellent for stretching and launching (especially as a beginner) and also great for serving and eating pizza on. I have a digital infra red laser thermometer for checking the temperature of the pizza oven, (also it just looks cool and is great fun holding it like a gun and checking the temperature of everything James Bond style! I have a number of dough trays to prove my dough balls in, a fantastic G.I. Metal turning peel for the pizzas, an amazing Ooni pizza rocker blade (I much prefer this to using a traditional pizza cutter wheel) a decent set of kitchen scales, and micro scales for measuring tiny amounts of yeast. Oh yes, and a large 10 qlitre Famag spiral dough mixer….great for when we do pop-up events. I’m sure there’s plenty more, but these are my essentials.
How do you get the perfect base and crust?
It’s all down to making good dough, giving it time to prove (18-24hours if you can), stretching it out gently, pushing all the air from the centre of your doughball to the edges, and having a very hot oven. The stone temperature of these portable pizza ovens can get up to 500ºc. I normally heat my oven up to 430ºc-450ºc. There are so many helpful videos online to watch about how to make and stretch your dough. I still have a lot to learn about baking and dough, so I am constantly experimenting with different flours, hydrations, and proving techniques. I think by experimenting you learn what works, what doesn’t, and from there you find your own style.

Which type of flour do you use in your pizza dough?
I’ve always used Tipo 00 flours for my dough, but I’ve also begun experimenting with different blends and grains. I’m very much looking forward to trying your flour!
How long do you leave your dough to prove?
Again, this varies and I am still experimenting. I like to go for long 72 hour cold proves, and for that you need a strong flour, but I also I like 18-24 hour room temp proves. When I first started I would make pizzas from dough that was only a few hours old. The difference between a few hours and 24 hours is huge.

How did you discover Matthews Cotswold Flour?
My friend Scott from Scott’s Pizza Project posted about it on Instagram, he made some phenomenal pizzas with it, and then I saw more and more people using it for pizza and bread. It looked so good, I’ve always wanted to try it since.
What’s your favourite pizza topping flavour combination?
For me nothing can beat a Margherita pizza. It’s my favourite pizza, the benchmark to test all other pizzas by. The ingredients are simple, pure, and if they are of good quality their flavours will shine through. For pure decadence my current go pizza is this….. Garlic infused Extra Virgin Olive oil drizzled on the base, a sprinkle of Grana Padano, fresh mozzarella, Parma Ham (cooked in the oven! ( I know, sacrilege!) then post bake I top the pizza with Stracciatella cheese, lightly roasted pistachios, fresh lemon zest, and a final glug of olive oil. Delicious!
Are there are flavours or ingredients you haven’t tried using yet?
Ahh, so many. I’m not a Vegan but I’ve been actively trying to reduce my meat and cheese consumption and come up with tasty pizzas using more sustainable veg and cheese substitutes that actually taste good. I love all kinds of chillies and hot toppings and feel there is more research for me to do out there, and also Turkish style Pide pizzas, I really want to try some of those recipes.

Which ingredients do you use for your pizza sauce?
If I’m going 100% traditional I will use San Marzano tomatoes, hand crush them and pretend I’m a proper Italian Pizzaiolo, then I’ll add a small amount of salt. I’m also a big fan of Isle of Wight tomatoes and will often use their products. Their passata is simply delicious, and I love adding their fresh varieties as toppings to my pizzas as well. The Island has a fantastic climate for growing tomatoes, I got married there, and well, I just love that Island!
Is there anyone in the pizza world that you really admire or are inspired by?
There are so many people that have inspired me along the way and continue to do so daily. From world famous pizzaiolos, to the many home chefs with pizza ovens who create incredible pizzas and share their recipes and experiences online and on Instagram. I learn and share with all of these people online. I think the pizza and baking community online is one of the friendliest there is, sharing and supportive. I recently went on a Pizza Masterclass with Marco Fuso, an incredibly experienced Pizzaiolo, knowledgeable, humble, and kind. I had the best three dough filled days of my life. His skill and passion was second to none, and he had been doing it, day in, day out for more than 20 years with such love and dedication. I still have so much to learn, and many mistakes to make, but that’s all part of the fun, So yes, Marco Fuso has been a big inspiration. All these people inspire me on a daily basis, my friends in the @pizzaiolotribe , @thezareport, @pizzaislovely for ALL his help over the years, @base.face.pizza and @bigslicepizzaco, @drneapolitan, @mozza_fella & @unholypizza, @scottspizzaproject, the list is actually endless, If you were to look at the people that regularly comment on my posts on Instagram then you would discover a bunch of highly skilled pizza lovers who are all worth following and connecting with.
Do you have any advice for a first-time pizza maker?
Find a good quality flour, choose a dough recipe, and follow that same recipe for few goes to get used to making the dough. The first recipe I used was an @pizzapilgrims recipe for Neapolitan dough. You can find it online. It’s very simple to follow and if you’re using a pizza oven for the first time, it will blow your mind! Buy the best ingredients you can find, and start simple. Have fun…..I mean, it’s impossible not to!!
And finally, what’s your favourite thing about pizza?
For me the best thing about pizza is how it brings people together, and how it just makes you happy! You can be having the worst day, but put a gorgeous slice of Neapolitan pizza in your mouth and all those troubles are gone! Since getting my Ooni four years ago, I have made so many new friends in our communal garden. I’m known locally in our block as the Pizza Guy, and when I make pizzas in the back garden, I always make extra doughballs for neighbours that often come out when they see me firing up the oven. If you can make a pizza, give it to a friend, watch them take a bite, see their face light up, and their eyes roll back in delight, then that is what I strive for, and that is my favourite thing about pizza!
My Detroit Style Pizza Recipe:
- 130g of the best quality passata you can find ( or make up your own Detroit tomato sauce to your likings, the are no rules and loads of recipes online)
- 250g of grated cheese mixture ( I combined Mature cheddar, mozzarella, red Leicester and Perorino Romano. Asda do a four cheese blend which is meant to be amazing for Detroit!)
- 150g of mild Cheddar cut roughly into 2cm cubes (to press into the dough later)
- 1 x pot of M&S Sundried tomatoes and mozzarella balls
- 10 or more Fresh basil leaves thinly sliced – Perorino Romano for a light dusting post bake.
I use a 10”x14” @lloydpans for this Detroit, and the perfect weight of dough for this size pan is around 450g.
- Flour 257g Strong Bread flour
- Water 180g (room temp) 70% hydration
- Fresh Yeast 0.8g (Dried yeast 0.3g)
- Olive Oil (Extra Virgin) 6g
- Salt 6.4g
Instructions
- Add the yeast to water and dissolve.
- Add 90% of the water to the flour in a large mixing bowl and bring it all together with your hands until there are no dry bits of flour left and your mixture is kind of roughly mixed.
- Cover the bowl and leave for 20-30mins
- Remove the cover and add the salt and the remaining 10% of the water. The dough will still feel quite wet but don’t worry, keep squidging it all together with your hands until the water is roughly absorbed and the salt has been mixed in.
- Add the olive oil to the dough and mix in evenly by folding the dough over itself a few times in the bowl.
- Cover and leave for 30 mins.
- After 30 mins, more of the water should be absorbed. I then give the dough two coil folds and put it back into the bowl and cover.
- I then repeat this process 4 times at 30 min intervals
- The fifth time you come to do your coil folds you should notice your dough is much smoother and easier to remove from the bowl. After this final coil fold, place your dough back into the bowl, cover with an airtight cover and place in the fridge for 48 hours….or longer up to 72 hours if you prefer.
- 6 hours before you want to bake your Detroit, take the dough from the fridge and get your pan ready by adding a tablespoon of olive oil to the pan and rubbing it all over so no part of the pan remains untouched by the oil. I also add a small knob of butter and rub this into the bottom of the pan.
- Remove the dough from the bowl and place it in the centre of the pan. Using your fingers, dimple the dough and press it outwards towards the edges of the pan. It won’t stretch all the way to the edges the first time. Leave it for 20 mins and then repeat, and then repeat another 2 times. By the 4th time your dough should be evenly spread across the pan and touching all the corners.
- Cover and leave for 3 hours then give the dough one final dimple. The dough should be looking nice and puffy by now and when you gently dimple, small air bubbles in the dough will appear. At this point I roughly cut 20 2cmx2cm cubes of cheddar and place them evenly spaced into the dimples of the dough.
- Cover and leave the dough for another hour. During this time turn your oven on to 250ºc and if you have a baking stone or baking steels place one on the middle shelf and one on the top shelf.
- After and hour or so place your pan in the oven and parbake on the top shelf for 9 mins
- Remove the tin from the oven and then cover it with your grated cheese mix adding extra cubes of mild cheddar to the four corners of your Detroit. Don’t hold back, add as much cheese to the corners as you can!
- Return the pan to the top shelf for 5 mins, and then to the middle shelf for 5 mins
- Once out of the oven I add two thick stripes of my passata with a large spoon and then add the mozzarella balls and sundried tomatoes.
- I then put it back in the oven on the middle shelf just for another minute more so the mozzarella balls just begin to melt slightly!
- I then remove it from the oven and let it rest for 5-10 mins…..during this cooling period the Detroit normally contracts a little in size and makes it easier for you to remove it from the pan with a fish slice!
- Place the Detroit on a large cooling rack and add your finely sliced basil, then stand back …take 50 or so pictures of it for Instagram, and then slice into 6 pieces and fight over who gets the really cheesey corners!! Again, I’m relatively new to Detroit pizza making and if you are looking for more information and inspiration then I would highly recommend checking out @pizzaislovely and be wowed by his creations!
I realise this is a very long procedure, and if you have a high hydration bread recipe you prefer to use, then try this and just add a little olive oil to your dough when mixing.
Congratulations on being our Baker of the Week!
If you’d like to see more, please follow Dough and Behold on Instagram, Twitter, and Facebook!
← Older Post Newer Post →


